How to Implement the Pub/Sub Pattern with .NET, Amazon SNS and CloudEvents
There is no shortage of technologies that allow for building pub-sub messaging systems. Off the cuff, I can think of NServiceBus, Azure Service Bus, RabbitMQ, MassTransit, etc. However, Amazon Simple Notification Service or SNS, may be the easiest to implement as well as the most flexible solution.
What Exactly is the Pub-Sub Pattern?
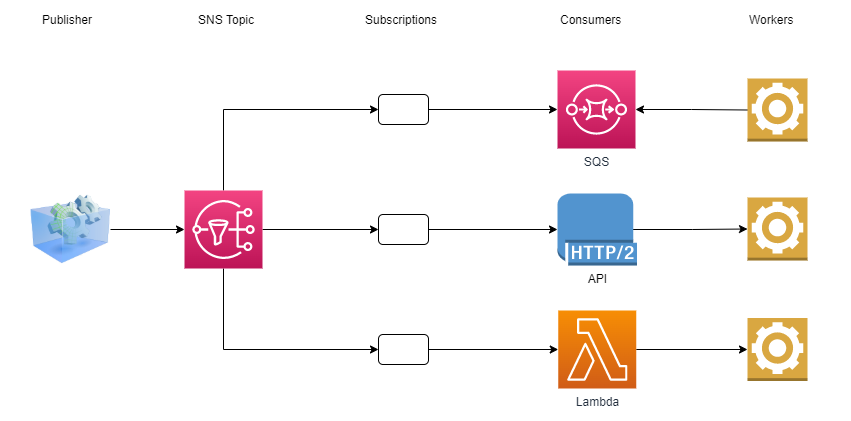
In essence, the pub-sub pattern or publish-subscribe pattern, is a messaging pattern in software architecture where a publisher creates a message and sends it to a predetermined location for one or more subscribers to consume. The predetermined location has different names and has differing structures in different systems. However, in this tutorial we will refer to that predetermined location as a “topic”. To look at it from the consumer’s perspective, a consumer would subscribe to a topic of interest and when the publisher publishes a message to the topic, the consumer and any other subscribed consumers would receive the message.
Let’s talk about that flexibility a bit. With Amazon SNS, a “message” or notification, as Amazon calls them, can be routed to Amazon Lambda functions, Amazon SQS queues, as well as HTTP/HTTPS endpoints, email, SMS, et. al. As you can imagine, this flexibility can be very powerful, especially in an environment where message consumers are using varying technologies.
“…this flexibility can be very powerful, especially in an environment where message consumers are using varying technologies.”
Back to the first claim that SNS may be the easiest to implement – Amazon makes it easy to sign up for a free AWS account, couple that with the SNS .NET SDK and you are ready to go. Oh, and Amazon SNS is also a managed service that can scale out almost limitlessly to handle even the most chatty message systems. So, once you hit production, rest assured that Amazon Simple Notification Service can handle your messaging solution.
The Solution
In this post, we’ll take you through building a .NET message publisher that sends messages through Amazon SNS. We’ll also incorporate formatting the messages by adhering to the CloudEvents specification. The CloudEvents spec has gained a lot of momentum in cloud development over the last few years by bringing standardization to messaging schemas. Read more on the CloudEvents spec.
Remember, for any example solution from AWS with .NET, we focus on the code that exemplifies the problem we are trying to solve. We don’t include logging, input validation, exception handling, etc., and we embed the configuration data within classes instead of using environment variables, configuration files, key/value stores and the like. These items should not be skipped for proper solutions.
Prerequisites
To complete this solution, you will need the .NET CLI which is included in the .NET SDK. In addition, you will need to create an AWS IAM user with programmatic access with the appropriate permissions to publish messages to SNS and read messages from Amazon SQS. For this exercise, you can use the AmazonSQSFullAccess and AmazonSNSFullAccess policy. After creating your IAM user, record the access key and secret for later use. In addition, you will need to download the AWS CLI and configure your environment or configure the Amazon SNS topic through the AWS console.
Warning: some AWS services may have fees associated with them.
SNS Publisher Project Structure
First, let’s start off by creating a .NET console application. This will be the app that you’ll run to send the message. Run the following command from the command line/terminal to create the publisher app.
$ dotnet new console --name Publisher
We will need to create three supporting class libraries. Let’s now create a .NET class library named Abstractions. This project will contain all of the interfaces for the application.
$ dotnet new classlib --name Abstractions
Similarly, let’s create a class library that will be the home for the CloudEventsMessageFormatter. The CloudEventsMessageFormatter will take string input and return a string that is encoded to meet the CloudEvents message specification.
$ dotnet new classlib --name CloudEventsMessageFormatting
We will also need to create a class library that contains the SNS message publisher. We can create this class library like so:
$ dotnet new classlib --name SNSMessagePublishing
Ok, now that we have our project structure defined, we now need to set up project dependencies. The SNSMessagePublishing project that contains the SNSMessagePublisher will have a dependency on the Abstractions project and we can add that dependency with the CLI:
$ dotnet add SNSMessagePublishing/ reference Abstractions/
In order to send messages through SNS, we also need to add package references to the SNSMessagePublishing project and we can do that with the following command.
$ dotnet add SNSMessagePublishing/ package AWSSDK.Core
$ dotnet add SNSMessagePublishing/ package AWSSDK.SimpleNotificationService
Let’s now turn our focus to the CloudEventsMessageFormatting project. The project will also need a project reference to the Abstractions project and we can add that reference, just like we previously did.
$ dotnet add CloudEventsMessageFormatting/ reference Abstractions/
CloudEventsMessageFormatting also needs to add a couple package references to the CloudEvents SDK and they can also be easily added via the CLI.
$ dotnet add CloudEventsMessageFormatting/ package CloudNative.CloudEvents
$ dotnet add CloudEventsMessageFormatting/ package CloudNative.CloudEvents.NewtonsoftJson
The last project to get set up with dependencies is our Publisher project. The Publisher project will have dependencies on Abstractions, CloudEventsMessageFormatting, and SNSMessagePublishing. We can add those project reference with one command.
$ dotnet add Publisher/ reference Abstractions/ CloudEventsMessageFormatting/ SNSMessagePublishing/
You should now have 4 .NET projects. To make things a little easier, let’s create a solution file and associate the projects.
First we create the solution file.
$ dotnet new sln --name SNSPublishing
Once the solution file is created, we can now add the projects to the solution file.
$ dotnet sln add Abstractions/ CloudEventsMessageFormatting/ SNSMessagePublishing/
Let’s test out the solution file by building the solution.
$ dotnet build
Look through the output and you should see that all projects built successfully.
As a housekeeping measure, remove the Class1.cs file from each class library project that was created.
Developing the SNS Publisher
Ok, now that we have our project structure set and everything compiles, let’s start to build the logic of the app. The first thing we are going to do is define our interfaces in the “Abstractions” project.
Abstractions
Let’s start out by creating an IPublisher interface. The generic IPublisher interface is simple, it’s sole Method, “Publish” accepts a generic TMessage parameter as input and outputs the generic TOut. We’ll talk more about this interface and why it is structured like this when we take a look at the SNS implementation.
When finished, the interface should look like this:
public interface IPublisher<TMessage, TOut>
{
    TOut Publish(TMessage message);
}
Next, let’s create the IMessageFormatter interface. Again, this interface is pretty simple. We have one method named, “Format” that takes a generic TIn parameter and outputs another generic value, TOut. Your completed IMessageFormatter interface should look like this:
public interface IMessageFormatter<TIn, TOut>
{
    TOut Format(TIn message);
}
CloudEvents Message Formatter
Now that our interfaces are complete, let’s create some implementations based on the interfaces. First, let’s create our CloudEventsMessageFormatter.
We first need to create a class in the CloudEventsMessageFormatting project named, “CloudEventsMessageFormatter” and this class will implement the IMessageFormatter interface. As the name describes, the duty of this class will be to format a message in a schema that adheres to the CloudEvents spec. We will make this class generic so we have some flexibility over the input type of the message.
using System;

namespace CloudEventsMessageFormatting.CloudEventsMessageFormatter
{
    public class CloudEventsMessageFormatter<TIn> : IMessageFormatter<TIn, String>
    {
        public String Format(TIn message)
        {

        }
    }
}
Let’s really start to flesh out the Format method. A CloudEvent is instantiated with values for the DataContentType, Data, Type, Source, Id and Time properties.
CloudEvent cloudEvent = new CloudEvent(CloudEventsSpecVersion.V1_0)
{
    DataContentType = "text/plain",
    Data = message,
    Type = "test.type",
    Source = new Uri("urn:a.b.c"),
    Id = Guid.NewGuid().ToString(),
    Time = DateTime.Now
};
Let’s briefly describe the aforementioned CloudEvents properties.
DataContentType: Describes the type of data that is contained in the data property.
Data: The actual message data or payload.
Type: A string describing the type of event that is being emitted.
Source: A URI that describes the context of the event producer.
Id: A UUID for the event. Together the Source and Id must be globally unique.
Time: The time of the event.
Checkout CloudEvents for more information on these properties.
Once the CloudEvent is instantiated, we need to encode the message to a string so we can move it across the wire.
var jsonFormatter = new JsonEventFormatter();

var eventMessage = jsonFormatter.EncodeStructuredModeMessage(cloudEvent,
   out var contentType);

string encodedMessage = System.Text.Encoding.UTF8.GetString(eventMessage.ToArray(), 0,
   eventMessage.Length);
Here’s a look at the complete CloudEventsMessageFormatter class.
using System;
using CloudNative.CloudEvents;
using Abstractions;
using CloudNative.CloudEvents.NewtonsoftJson;

namespace CloudEventsMessageFormatting
{
    public class CloudEventsMessageFormatter<TIn> : IMessageFormatter<TIn, String>
    {
        public String Format(TIn message)
        {
            CloudEvent cloudEvent = new CloudEvent(CloudEventsSpecVersion.V1_0)
            {
                DataContentType = "text/plain",
                Data = message,
                Type = "test.type",
                Source = new Uri("urn:a.b.c"),
                Id = Guid.NewGuid().ToString(),
                Time = DateTime.Now
            };

            var jsonFormatter = new JsonEventFormatter();

            var eventMessage = jsonFormatter.EncodeStructuredModeMessage(cloudEvent,
               out var contentType);

            string encodedMessage = System.Text.Encoding.UTF8.GetString(
               eventMessage.ToArray(), 0, eventMessage.Length);

            return encodedMessage;

        }
    }
}
SNS Message Publisher
Our next step is to create the SNSMessagePublisher class. The responsibility of the SNSMessagePublisher is to send a message using Amazon Simple Notification Service. After we create the class we need to make sure it implements the IMessagePublisher interface like so:
namespace SNSMessaging
{
    public class SNSMessagePublisher : IPublisher<String,Task>
    {
        public async Task Publish(String message)
        {

        }
    }
}
Let’s make a couple simple additions. We’ll create a constructor, pass in the IMessageFormatter and then assign the value of that parameter to a field.
namespace SNSMessaging
{
    public class SNSMessagePublisher : IPublisher<String,Task>
    {

        private readonly IMessageFormatter<String, String> _formatter;

        public SNSMessagePublisher(IMessageFormatter<String, String> formatter)
        {
            _formatter = formatter;
        }

        public async Task Publish(String message)
        {

        }
    }
}
Now, let’s implement the Publish method. We’ll start out by creating some local variables that will hold our SNS configuration. Normally, this data would come from configuration, but for simplicity, we’ll forego configuration for this exercise.
String topicArn = "<your-aws-topicarn>";
String awsRegion = "<your-aws-region>";
String accessKey = "<your-aws-accesskey>";
String secret = "<your-aws-secret>";
Let’s now use the IMessageFormatter to format the string that was passed in.
String formattedMessage = _formatter.Format(message);
Ok, now that we have our SNS configuration data set and have a formatted message, let’s set up the call to Amazon SNS via an SNS client.
BasicAWSCredentials creds = new BasicAWSCredentials(accessKey, secret);
RegionEndpoint region = RegionEndpoint.GetBySystemName(awsRegion);

var snsClient = new AmazonSimpleNotificationServiceClient(creds, region);
Great, we are now ready to create the request to Amazon SNS and then receive the corresponding response. Here you see that we capture the response data in a local variable. In a real world application you would probably want to log some of that response data.
PublishRequest publishRequest = new PublishRequest(topicArn, formattedMessage);

PublishResponse response = await snsClient.PublishAsync(publishRequest);
That’s it, let’s take a look at the SNSMessagePublisher class in its entirety.
using System;
using System.Threading.Tasks;
using Abstractions;
using Amazon;
using Amazon.Runtime;
using Amazon.SimpleNotificationService;
using Amazon.SimpleNotificationService.Model;

namespace SNSMessaging
{
    public class SNSMessagePublisher : IPublisher<String,Task>
    {

        private readonly IMessageFormatter<String, String> _formatter;

        public SNSMessagePublisher(IMessageFormatter<String, String> formatter)
        {
            _formatter = formatter;
        }

        public async Task Publish(String message)
        {
            String topicArn = "<your-aws-topicarn>";
            String awsRegion = "<your-aws-region>";
            String accessKey = "<your-aws-accesskey>";
            String secret = "<your-aws-secret>";

            String formattedMessage = _formatter.Format(message);

            BasicAWSCredentials creds = new BasicAWSCredentials(accessKey, secret);
            RegionEndpoint region = RegionEndpoint.GetBySystemName(awsRegion);

            var snsClient = new AmazonSimpleNotificationServiceClient(creds, region);

            PublishRequest publishRequest =
               new PublishRequest(topicArn, formattedMessage);

            PublishResponse response = await snsClient.PublishAsync(publishRequest);

        }
    }
}
Sending the CloudEvents message via SNS
We’re just about ready to put a bow on this solution. But first, let’s move over to the Publisher console app that we created earlier. We’ll run this app to send a message to Amazon SNS. The first thing we need to do is complete the Main method. Step one is changing the signature of the Main method to support async/await:
static async Task Main(string[] args)
Next, within the Main method, let’s instantiate the CloudEventsMessageFormatter.
IMessageFormatter<String, String> formatter = new CloudEventsMessageFormatter<String>();
We then instantiate the SNSMessagePublisher, passing in the CloudEventsMessageFormatter.
IPublisher<String, Task> publisher = new SNSMessagePublisher(formatter);
Now, we are ready to send our message. We create the message using a local variable and then publish the message using the “Publish” method on the SNSMessagePublisher object, name “publisher.”
String message = "This is a test from the .NET Publisher at " + DateTime.Now;

await publisher.Publish(message)
And, we are finished! The Program class is shown below.
using System;
using System.Threading.Tasks;
using Abstractions;
using MessageFormatters.CloudEventsMessageFormatter;
using SNSMessaging;

namespace Publisher
{
    class Program
    {
        static async Task Main(string[] args)
        {
            IMessageFormatter<String, String> formatter =
               new CloudEventsMessageFormatter<String>();

            IPublisher<String, Task> publisher = new SNSMessagePublisher(formatter);

            String message = "This is a test from the .NET Publisher at " + DateTime.Now;

            await publisher.Publish(message);

            Console.WriteLine("Message Sent: " + message);

            Console.ReadLine();
        }
    }
}
Run the Publisher application from the CLI.
$ dotnet run --project ./Publisher
You will then see a message that looks something like:
Message Sent: This is a test from the .NET Publisher at 8/01/2021 11:42:00 AM
Subscribe an SQS queue to your topic with raw message delivery and run the application again and you will receive a message something like this. Notice the message that was sent is contained in the data node. Also note the properties that were set when you instantiated the CloudEvent in the formatter.
{
   "specversion": "1.0",
   "datacontenttype": "text/plain",
   "type": "test.type",
   "source": "urn:a.b.c",
   "id": "a59af730-9133-4cee-8905-d5a22ff98788",
   "time": "2021-08-23T11:53:47.0233494-04:00",
   "data": "This is a test from the .NET Publisher at 8/01/2021 11:53:42 AM"
}
Challenges
Now that you have a working app, let’s take things a little further…
- Subscribe a second Amazon SQS queue to see the fan out or pub/sub pattern.
- Subscribe an Amazon Lambda Functon or HTTP(S) endpoint.
- Modify the solution to create a message from an object rather than a string and change the DataContentType of the CloudEvent to “application/json”.
- Modify the solution to use configuration and dependency injection and minimize the dependencies of the Publisher console app.
That’s it. We have concluded this tutorial where you have learned how to implement the pub-sub pattern with .NET, Amazon SNS and CloudEvents.
Checkout this tutorial if you need help creating an Amazon SNS topic and subscribing an Amazon SQS queue.